Building an interactive dashboard with SharePoint 2010 RESTful Services
Posted: August 1, 2010 Filed under: Development, SharePoint | Tags: MOSSIG, MVVM, RESTful Services, SilverLight, WCF, WCF Data Services 1 CommentREST (or Representational State Transfer) is an easy way to easily get or post items to a server-side web service. It is used in situations where you would use a web service but do not want the overhead and tightly-coupled nature of SOAP. Technically, REST is not a protocol, but an architectural style. It complies to Open Data Protocol (OData), a Web protocol for querying and updating data that provides a way to unlock your data and free it from silos that exist in applications today.
SharePoint 2010, being based on WCF in the .NET 3.5 Framework, has built-in RESTful web services which allow us to take advantage of this simplicity in custom applications we write..
The RESTful service can be accessed via http://<site collection url>_vti_bin/ListData.svc
This blog post is based on my Demo #2 last week at MOSSIG user group meeting in Melbourne.
The Data for this dashboard is sourced from 2 custom lists “Products” and “Sales” The two lists has parent-child relationship.
Sales List
Edit Sale Item.
Any given list can be accessed via the RESTFul service. This demo application is using WCF Data Services to read/write to sharepoint list Data, then, WCF Data Services was the first Microsoft technology to support the Open Data Protocol. It provides developers with client libraries for .NET, Silverlight, AJAX etc..
Once the service proxy is created from ListData.svc you will have typed access to all the list data with LINQ support. The following code segment in the ViewModel shows how sales data is obtained from the service along with corresponding product details and register for Unit of Work tracking when property change.
private void GetSalesData()
       {
           // Set up the data context if it hasn't been done already
          if (_dataContext ==null)
          {    _dataContext = new HomeDataContext(
               new Uri("http://spdemo/_vti_bin/ListData.svc"));
          }
          Sales = new ObservableCollection<SalesItem>();
           //Prepare REST service request
           var query = (from s in _dataContext.Sales.Expand("ProductCode") select s ) as DataServiceQuery<SalesItem>;
           query.BeginExecute(
               (ar) =>
               {
                   IEnumerable<SalesItem> _salesItems = query.EndExecute(ar);
                   foreach (SalesItem item in _salesItems)
                   {
                       item.PropertyChanged += ((sender, e) =>
                       {
                           var entity = (SalesItem)sender;
                           //track changes to entities
                           _dataContext.UpdateObject(entity);
                       });

                       Sales.Add(item);
                   }
                   NotifyPropertyChanged("LineValue");
               }, null)
               ;
       }
The viewModel implements INotifyPropertyChanged event for the purpose of Notifying the view of Data changes and visa versa. The ViewModel exposes two properties LineValue (bound to the slider) and ObservableCollection of SalesItems. These 2 properties are declaratively bound to both chart types (bar and pie). I am using few charting controls from Silverlight Toolkit (http://silverlight.codeplex.com/) with XAML Declarative bindings as shown below.
            <TextBlock x:Name="ScoreTextBlock" Text="{Binding LineValue}" />
            <chart:Chart Height="200" LegendTitle="Item" Title="No of Units Sold By Product"
                         x:Name="MyBarChart" Width="562" DataContext="{Binding}">
            <chart:ColumnSeries x:Name="MySalesChartData" Title="Sales of Products"
                    ItemsSource="{Binding Sales}"
                    IndependentValueBinding="{Binding ProductCode.ProductName}"
                    DependentValueBinding="{Binding NoofUnits}"/>
            </chart:Chart>
            <chart:Chart Height="230" Title="Sales Distribution" x:Name="MyPieChart" Width="562" Margin="4,0">
                <chart:PieSeries ItemsSource="{Binding Sales}"
                    IndependentValueBinding="{Binding ProductCode.ProductName}"
                    DependentValueBinding="{Binding NoofUnits}" Background="#FF2B1515" />
            </chart:Chart>
The VS2010 solution that contains source code for this demo is uploaded here.
Enjoy!
SharePoint 2010 Live Image Capturing WebPart packaged as a Sandbox solution
Posted: August 1, 2010 Filed under: Development, SharePoint | Tags: Client object model, MOSSIG, MVVM, SandBox Solutions, SharePoint 2010, SilverLight Leave a commentIt was great speaking and networking with fellow members at MOSSIG July meeting in Melbourne last week. I presented a session on Effective use of SilverLight 4 with SharePoint 2010. The Slide deck is uploaded here. I demoed a SilverLight 4 WebPart taking a snapshot on demand and with the help of client object model automatically save the captured snapshot to SharePoint picture library.
This demo solution was created to showcase effective use of SilverLight 4 in SharePoint 2010 as well as to show how MVVM (Model-View-ViewModel) pattern pattern is used in designed and developing maintainable and testable SilverLight applications with powerful declarative Data binding capabilities
I thought of writing a little elaborative blog post about this solution and here we go…
First lets have a look at the outcome.
Final Result:
By the way this is my little boy Bryan. He enjoyed this a lot 🙂
The picture library to be used for storing the captured images can be configured by the user as shown below as a WebPart property.
Solution Type:
This is sandbox solution. Therefore as site collection administrator you can add this solution to your solution gallery and try out its functionality with minimal impact on your farm as compared to a classic farm solution. SharePoint perform resource monitoring of your sand box solutions as shown below. If it doesn’t behave properly it will be kicked out by SharePoint before you even know about it at times . How cool is that ?
This is a great model for ISV’s to distribute their apps and Farm/Site Collection Administrators to trial out third-party solutions with minimum risk.
Solution architecture:
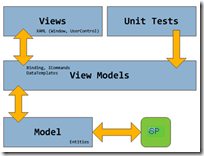
The basic solution archtecture is shown below. The viewmodel is decorating the model/Repository and sits between your model(domain objects) and the view. MVVM is targeted at modern UI development platforms (WPF and Silverlight). You can read more about this simple pattern here
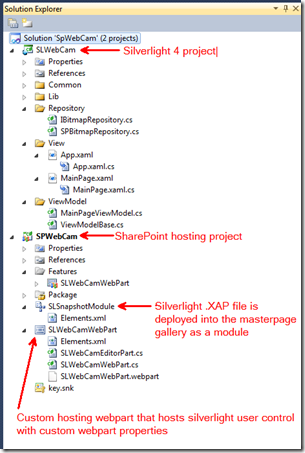
The VS2010 solution structure for this application is as follows.
SandBox WebPart properties:
One of the limitation with running in the sandbox is that all web parts must inherit from “System.Web.UI.WebControls.WebParts.WebPart” instead of “Microsoft.SharePoint.WebPartPages” (which is not allowed) when running in the sandbox. This means the traditional means of creating custom Web Part Properties using the ToolPart object in SharePoint is not available. Thus one must now rely on how these custom properties are created when dealing with ASP.Net Web parts. Which by the way (as is obvious in the sandbox restriction) is now the preferred way to create web parts. ASP.Net Web Parts have an equivalent class to the “ToolPart” class called the “EditorPart”. So I’ve created my webpart property editor inheriting from EditorPart as shown below.
// Create a custom EditorPart to edit the WebPart control.
 [AspNetHostingPermission(SecurityAction.Demand,
     Level = AspNetHostingPermissionLevel.Minimal)]
 public class SLWebCamEditorPart : EditorPart
 {
     private DropDownList _partTargetLibrary;

     public SLWebCamEditorPart()
     {
         Title = "Image capture webpart settings";
     }

     private DropDownList PartTargetLibrary
     {
         get
         {
             EnsureChildControls();
             return _partTargetLibrary;
         }
     }
[Personalizable, WebBrowsable(false)]
public String PictureLibraryName { get; set; }
protected override void CreateChildControls()
       {

           var width = "400";
           var height = "600";
           base.CreateChildControls();
           string source = SPContext.Current.Site.Url + "/_catalogs/masterpage/SLWebCam.xap";
           Controls.Add(new LiteralControl(
           "<div>" +
           "  <object data=\"data:application/x-silverlight-2,\" type=\"application/x-silverlight-2\" width=\"" +
           width + "\" height=\"" + height + "\">" +
           "      <param name=\"source\" value=\"" + source + "\"/>" +
           "      <param name=\"onerror\" value=\"onSilverlightError\" />" +
           "      <param name=\"background\" value=\"white\" />" +
           "      <param name=\"minRuntimeVersion\" value=\"4.0.50401.0\" />" +
           "      <param name=\"autoUpgrade\" value=\"true\" />" +
           "      <param name=\"initParams\" value=\"MS.SP.url=" + SPContext.Current.Site.Url +
                           ",PictureLibraryName=" + PictureLibraryName +      …..Continue..
The injected initparam values in the serverside can be extracted from the client side and stored as application resource as shown below.
private void Application_Startup(object sender, StartupEventArgs e)
{   // Extract init params and inject into application resource dictionary
    foreach (var resource in e.InitParams)
    {
        Application.Current.Resources.Add(resource.Key,resource.Value);
    }
    this.RootVisual = new MainPage();
}
Declarative DataBinding:
The XAML based view was created using VS2010 enhanced UI designer. The ViewModel exposes the necessary bindable properties and bindable commands (using command pattern). In other words ViewModel is the datacontext for the View
ie: XAML markup for showing the live web cam video uses a Rectangle bound to a property named VideoBrush in the ViewModel as shown below.
<Rectangle Fill="{Binding VideoBrush}" Height="138" Width="170" />
private VideoBrush videoBrush;
public VideoBrush VideoBrush
{
    get { return videoBrush; }
    set
    {
        videoBrush = value;
        FirePropertyChanged("VideoBrush");
    }
}
The view Model implements INotifyPropertyChange interface. Notifies clients that a property value has changed. The snapshots taken are exposed as a ObservableCollection of Writable bitmaps from the ViewModel and bound to a ListBox with a DataTemplate as shown below. ObservableCollection Represents a dynamic data collection that provides notifications when items get added, removed, or when the whole list is refreshed.
public ObservableCollection<WriteableBitmap> Images { get; set; }
   public ICommand StartCaptureCommand { get; set; }
   public ICommand StopCaptureCommand { get; set; }
   public ICommand TakeSnapshotCommand { get; set; }
   public ICommand SaveSnapshotCommand { get; set; }
 <ListBox x:Name="Snapshots"
  ItemTemplate="{StaticResource SnapshotDataTemplate}"
  ItemsPanel="{StaticResource SnapshotItemsPanelTemplate}"
  ItemsSource="{Binding Images}"
  SelectedItem="{Binding SelectedSnapshot, Mode=TwoWay}" Height="123"   Width="356" />
using Microsoft.SharePoint.Client;
When the user select a snapshot and click the save button ClientContext is initiated and List information is obtained from the server via Client OM as a Asynchronous operation. On the successful callback FileCreationInformation object is created with the image content , add the new file to the list of files and commit is performed as a another asynchronous call to the server.
/// <summary>
 /// Obtain list instance with required minimum information via Client OM
 /// </summary>
 private void GetSpTargetListInfo(string listname)
 {
     //first build the workload
     _targetlist = _ctx.Web.Lists.GetByTitle(listname);
     _ctx.Load(_targetlist, l => l.RootFolder.ServerRelativeUrl);
     //now execute it as a on single batch
     _ctx.ExecuteQueryAsync(ListloadSucceeded, ListloadFailed);
 }
private void ListloadSucceeded(object sender, ClientRequestSucceededEventArgs e)
      {

          if (_img == null) return;
          using (Stream fs = _img.ToStream())
          {

              var fileContent = new byte[fs.Length];
              fs.Read(fileContent, 0, fileContent.Length);
              //create file object
              var file = new FileCreationInformation
                             {
                                 Content = fileContent,
                                 Url = ApplicationContext.Current.Url +                                       _targetlist.RootFolder.ServerRelativeUrl + "/" +
                                      Guid.NewGuid() + ".png"

                             };
              //add the new file to the target list
              var files = _targetlist.RootFolder.Files;
              files.Add(file);
              //Now execute the workload
              _ctx.ExecuteQueryAsync(UploadRequestSucceeded, UploadRequestFailed);
          }
      }
If you want to play with the webcam webpart a packaged Sandbox solution (SpImageCapture.wsp) can be downloaded here. When activating this solution Silverlight .XAP file named SLWebCam.xap will be created in the site masterpage gallery and a hosting WebPart will be added to your WebPart gallery named SLWebCamWebPart.webpart Drag this WebPart to your page and configure its web part properties by specifying a picture library to use for storing the images and you are done. I’ve also uploaded the full VS2010 solution here if you are interested in the code.
Enjoy!


